How to make your own passport photos
Why make your own passport size photo?
1. It is so easy to make your own passport size photo if you have a digital camera, a computer and a photo editing software which most people already own these days.
2. It saves you money. Why pay the ridiculous amount of money the studios charge for a couple of passport size photos? Chains like Walgreens, CVS, Kinkos charge about $8 and professional photo studios may charge about $30 just for 2 passport size photos. For a family for four people, if you do-it-yourself you will be saving about $100. This adds up to much more for immigrants who generally take passport pictures for many applications like visa renewal, travel documents
, etc.
3. I have had bad experiences in chain stores where they don't take good photos. The photo was dark and I was worried if it will get rejected. You can take better pictures yourself at your own home at your own leisure.
Step-by-step instructions to make your own passport photo
1. Take a few nice color photos of the person using your digital camera.
Things to keep in mind:
* The person should be looking at the camera. Use a plain white or off-white background.
* The person should be wearing normal street attire.
* Uniforms should not be worn in photographs except religious attire that is worn daily.
* Do not wear a hat or headgear that obscures the hair.
* If you normally wear prescription glasses, a hearing device, wig or similar articles, they should be worn for your picture.
* There should not be any shadow in the background. So, I do not use Flash. I make sure there is enough light falling directly on the person.
Download all the pictures to your computer from the camera. Choose the one that you are satisfied with. Do not be let down by this long article. Think about how much money you will be saving by making your own passport photos.
I will be using the following picture as an example:
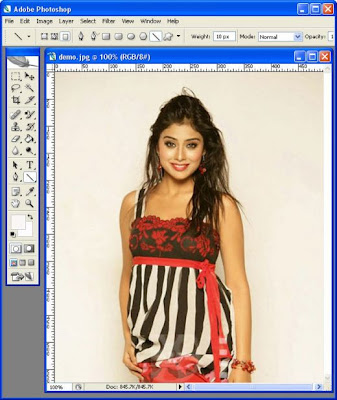
I know this is not the best picture, but I like this one and will be using this just for demonstrating the technique. You should be wearing better clothing and hair in your passport photo.
2. Use a photo editing software to crop the 2" x 2" region you want. This is the required size of passport photo in the U.S. The passport size requirement varies between different countries.
I will be using Adobe Photoshop CS2
to show you how its done. You can use any photo editing software. Most of them have the tools that I will be using.
Open your passport photo in Adobe Photoshop CS2
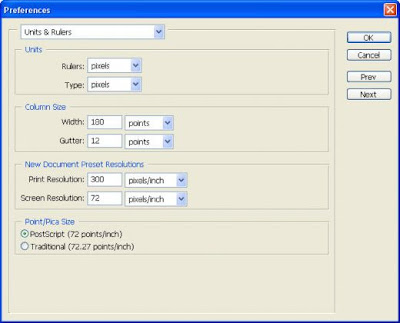
Click on the Edit menu -> Preferences -> Units & Rulers
In the dialog, change the units to "pixels" as shown below:
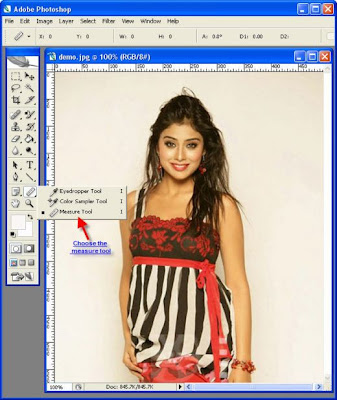
Measure the distance (in pixels) from the top of the head to the chin
* Use measure tool
* Hold on Shift while dragging the mouse ( to get vertical drag )
* The "D1" value gives the vertical distance in pixels
* this D1 should be 1 - (1 3/8)th inches of the 2x2 photo
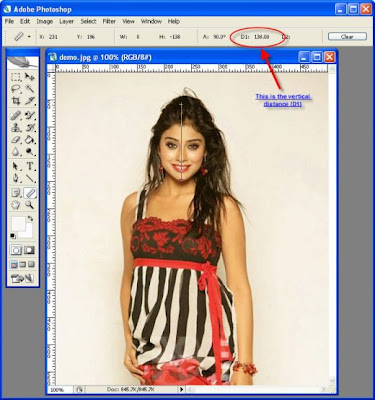
Calculate faceDist = D1 divided by 1.1 In our example faceDist = 138/1.1 = 125.4 (we will make it 125)
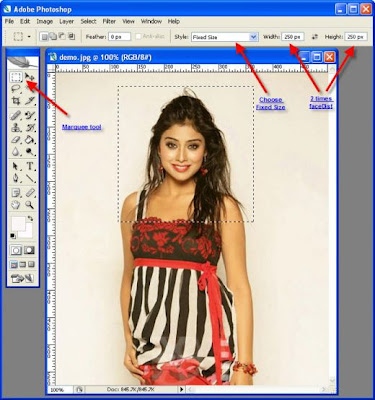
Select the Marquee tool
Select Fixed Size option and enter 2 times faceDist for the Width and Height options
Place the selection over the face region with the nose in the center of the selection as shown below:
I Love Adobe Photoshop
Ctrl-C to copy selection. Note that this selected region will be your passport photo.
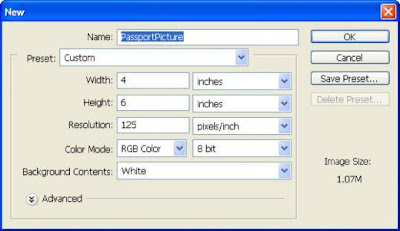
Select File -> New in Adobe Photoshop
In the new dialog, Set the Width to 4 inches and Set the Height to 6 inches and Set the Resolution to faceDist (calculated in step 4). See picture below:
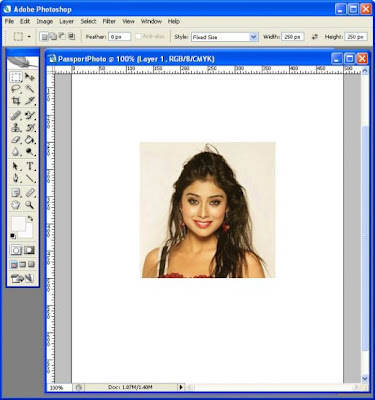
Ctrl-V to paste the previous selection
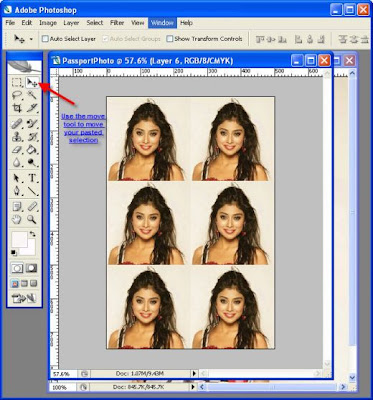
Use the move tool in Adobe Photoshop to move the selection to the top left corner of the canvas.
Do Steps (10) and (11) five more times to get 6 pictures aligned as shown below.
Save the final passport photo as a jpg file and print it using your digital printer. If you don't have one or if your printer prints with dots, go to a nearby walgreens or walmart and print your passport picture for 10 cents.
Properly cut the passport photos out of the digital print and you got a perfect passport size photo. Hurray! You have made your own passport photo in minutes. What a way to save some money... I have been doing this for years and am very glad to know this technique.
If you choose to submit digitized photos, they must meet the same requirements of all passport photographs. In addition, digitized photographs are always produced on digital printers. Some printers will produce a photograph in which the dots are seen. Visible dots distort the image by making it look grainy. Acceptable photos have a continuous tone image that looks very photo-like.
